
I love holidays and the chance to spend time with family. Plus, it’s a great excuse to decorate! This year, we are hosting an Easter luncheon for 26, and we can’t wait to catch up with everyone. To prepare for this celebration, I had fun doing a little bit of decorating and getting creative. From glitter eggs to a spring banner, our home is ready for a party!
- Fabric decoupaged eggs

I hit the jackpot in the Target dollar section when I came across these wooden eggs. I wasn’t sure how I wanted to decorate them at first, but I knew they were coming home with me. At home, I raided my fabric bin and found some marbled fat quarters that had been waiting to be used. I cut some of the fabric up into strips and decoupaged them on, using modge podge. I layered them and made sure to use some modge podge over the top of the fabric to give it some shine. I love the finished product; they remind me of Monet’s water lilies.
- Glitter eggs

It’s not a party without glitter! My cousin and I had a blast with these. We took white plastic eggs and painted them with chalkboard paint. Then we poured gold glitter into paper treat cups to use for dipping. Modge podge was painted onto half of each egg, and then they were dipped in the glitter. They sat outside to dry overnight. Last, we sprayed a clear coat of finish over them to keep the glitter from coming off.
- Bunnies

These bunnies have a purpose – to hold your silverware! I found a similar idea on Pinterest and ran with it. All you need is some cardstock and “decorations” – buttons, yarn, fabric, washi tape – you name it. The sky’s the limit!
For my bunnies, I found a clipart photo I liked and enlarged it to get it to the size I wanted. I cut it out, and this was my template I used for each bunny. I traced them onto cardstock and then cut them all out. To create the slits for the silverware to slide into, I used my rotary cutter and board, for a quick, even slice. They do make other tools for cutting paper as well (and can be found at Michaels or Hobby Lobby!). Washi tape and ribbon were used around the bunny’s middle. Then all that is left is the tail! I created fabric yo yos and yarn pom-poms, and these were affixed with turbo tacky glue. I promise to write a post later on about how to make these fun additions. They are quite simple to make, especially if you have the right tools! Jo-Ann Fabrics sells both: yo yo maker and pom-pom maker – these are so much fun to use!
- Spring banner
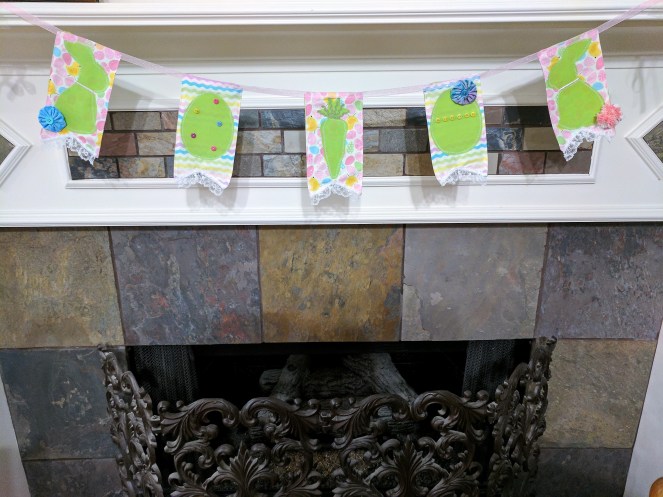
This banner came together very quickly and used supplies I already had on hand. I used fabric scraps, wonder under, and embellishments.
To make the banner, you need fabric for the background, the shapes, and the backing of each pendant. I found spring pictures I liked online, printed them, and cut them out to be templates. Then I traced them backwards (this is important) onto the rough side of the wonder under with a pencil. The rough side gets placed onto the wrong side of your fabric (so that the smooth side is facing up) and then ironed on. Once it’s ironed, you can cut along your pencil lines so that your shape is cut out. To get the wonder under backing off, you can use a straight pin to “cut” a line, and the rest will peel up. It will leave its adhesive behind and this will later get ironed on to your background fabric of each pendant. For the pendant itself, you can make it any shape you want! Just make sure to cut two of the same size – one for the front and one for its backing. (This will keep you from having rough edges and prevent fraying.) Place wrong sides of the fabric together and sew most of the way around using ¼ inch stitch. Leave some space at the end to turn your fabric back so it’s not inside out. Then sew the opening closed. I went back around the whole thing with a topstitch as well, but it’s not necessary. Once the pendant is created, you can iron on the shape you created earlier! To keep it from coming up in the future, it’s best to stitch around it – I used a fast zig-zag. After this comes the fun part – decorating! I used rick-rack, buttons, pom-poms, and yo yos on mine. These were sewn on by hand. At the end, I took ribbon and stitched it along the top of each pendant to create my banner. And voila!
Hoping everyone has a “hoppy” Easter!
